Measuring a Water Tank for a Replacement Liner

water tank dimensions-roundA water tank liner is a great way to extend the life of a water tank that is still structurally sound but leaks water. Tank liners also have the added benefit in that further leaks are usually prevented as there is now a permanent membrane between the water any potential spot where a leak may form due to rust, cracking or ground movement.

Typical residential water tanks come in one of two shapes. Either they are circular or they are rectangular with rounded ends.

Making a tank liner for a round water tank is a fairly straightforward process. The only complication is if there are structural supports. These can be accommodated for, but the liner will have to be installed by a professional who can weld the liner around the struts.

With slimline and other similarly shaped water tanks, the process is only slightly more complicated in that the end shape has to be measured properly.

Other shaped water tanks are usually specialty water tanks and should be inspected by a qualified installer.

Measuring Any Round Water Tank

All that is needed to work out the size of the tank liner is the internal diameter (d) of the tank and the height (h) of the inside of the tank.

You can also use these measurements to calculate the volume of your water tank. This example assumes you are measuring in meters.

Calculating the volume of your water tank:

π x (d/2) x (d/2) x h   where π is pie = 3.14159

so for a 2 m high tank with a diameter of 5 m, the volume is them

= 3.14159 x (5 ÷ 2) x (5 ÷ 2) x 2 = 39.27 m3

The amount of water that can be held is then 39.27 x 1000 = 39,270 litres

Measuring a Rectangular Water Tank, eg a slim line Water Tank

Slim line Water Tanks are a little more difficult to measure, but not too much. To work out the size exactly, you just need to take into account the flat middle section and then both rounded ends. Each end of the water tank is like a semi-circle. I will assume each end is the same as this is usually the case.

water tank dimensions-slimline

To measure you need:

h – height

d – width of flat middle section

a – width of water tank

b – distance from flat section to end of tank

volume is then:

2 x area of end pieces plus area of middle section

2 x π x (a/2) x (b) x h + a x d x h   where π is pie = 3.14159

so for a 1.8 m high tank, with a flat section that is 2 m long, is 800 mm wide and b is 500 mm.

2 x 3.14159 x (0.8 ÷ 2) x 0.5 x 1.8 + 1.8 x 2 x 0.8

2.26 m3 + 3.4 m3 = 5.66 m3

This means the volume of water that can be held is 5660 litres.

Preventative Spill Containment

If your company deals with hazardous substances, make sure you take the correct precautions to ensure any spills are contained and managed. Today it is not only our duty to protect the environment, but also a legal requirement. Fines can also be very hefty, easily outweighing any cost to prevent the spill in the first place.

As an example, in November 2014, a waste oil processing company was fined $22,500 and legal costs because they failed to store liquid waste properly. This resulted in pollution to a storm water canal and local creek.

(link to fine http://www.epa.nsw.gov.au/epamedia/EPAMedia14111403.htm)

spill containmentNo matter how careful we are, we know that spills and leaks will occur, so what to do? The best way is to install a secondary containment liner. These liners capture any spills and minimize risk of contamination to the environment as well as reducing costly cleanups.

At Fabric Solutions Australia, we specialise in all types of liners, including chemical and liquid bund liners that are specifically made to prevent spill contamination or pollution. Secondary spill containment liners, which are sometimes called berm liners, are used for the containment of liquids and gases thereby preventing contamination or pollution of the environment. They are used for the containment of spills and leaks, most commonly hydrocarbons and other potentially harmful chemicals that need to be managed correctly.

Our secondary containment liners are designed and used as a solution, both for the permanent or temporary containment of liquids or gases that may be potentially hazardous to the environment. Many different polymeric materials are used depending on the chemicals or contaminants involved. These include materials such as PVC, polyethylene, polypropylene, and polyurethane and others. FSA stocks materials that are suitable for the containment of many different liquids and chemicals. At Fabric Solutions Australia, we can produce secondary containment liners to suit almost any application or situation. If you are looking to buy liquid bund liners, contact FSA today.

Secondary Containment Applications:

  • Spill containment
  • Oil and gas industry
  • Wash down applications where contaminated water must be collected
  • Truck and car wash bays
  • Routine servicing of vehicles and plant equipment
  • Drive-on drive-off fuel transfer bunds
  • Contamination prevention for a range of products
  • Plant and equipment, such as generators, pumps or compressors

Main Features Secondary Containment Systems:

  • Depending on application, materials can be chemical and fuel resistant, oil and fat resistant or acid or alkali resistant
  • Sumps, collection or sampling points can be fitted as required
  • Can be custom made to whatever size and shape required
  • For use in almost any terrain
  • Protective groundsheets and covers also available

Material Options For Secondary Containment Applications:

  • PVC
  • Reinforced PVC (RPVC)
  • Elvaloy, Aeon®” XR3® and XR5®
  • Polyethylene (PE)
  • Reinforced Polyethylene (RPE)
  • Polypropylene (fPP)
  • Reinforced Polypropylene (RPP)
  • Polyurethane (TPU)

FSA are able to match materials to usage requirements.

Dam Liners – Installing Them Yourself

Where soil conditions are poor, quite often the only way to prevent leakage from a dam is with a dam liner. With the proper preparation it is possible to install a dam liners yourself. But there are some considerations:

  • You must prepare the site, and there must be no water in it
  • You will need a number of helpers, usually at least 1 person for every 8 m of dam liner that will have to be pulled. So if you are pulling an edge that is 40 m wide, we recommend at least 5 people help out.
  • You will need to dig a suitable trench all the around to anchor the liner
  • After installation you should cover or backfill liner to extend its life and protect the liner against UV degradation.

dam_liner_installation_images-01Dam Site Preparation

Prior to placing, unfolding and installing the dam or geomembrane liner, ensure that:

  • all roots, stumps logs, boulders, rocks, outcrops are removed and replaced with approved fill.
  • all vegetation, organic matter, loose clods, surface debris, mud, waterlogged ground and water is cleared.
  • approved fill is used to replaced any removed matter with compaction by rolling or vibration to a finished grade.
  • the surface is raked to a uniform texture to not exceed that of graded aggregate.
  • all graded surfaces are sandblinded to a particle size not exceeding that of course sand, to a max of 3 mm.
  • where needed, a geotextile protection underlay should be used. This will cushion and protect your dam liner or geomembrane from damage from sharp objects as well as elevating puncture, impact and abrasion resistance
  • there is free drainage to all surfaces in contact with liner membrane.
  • thedam liner is not installed in areas subject to flooding, tides, springs and thermal activity.
  • no water accumulates in the excavated site. All water must be pumped out prior to installation.
  • all rigid structures specified, including pipeworks, sumps etc. are to be completed before lining is installed.

dam_liner_installation_images-02Anchor Trench

Excavate a continuous perimeter trench on a stable berm surrounding the pond/dam site by means of trench digger or by means of an angled grader blade. The trench should be far enough from the edge of the berm to provide adequate anchorage. Allow for a minimum backfill of 500 mm over the buried liner.

Protrusions and Venting

Dam liner penetrations shall be subject to designed requirements for operational purposes. Approved foundations, pads and footings shall be provided to obtain a stable liner at penetrated positions. Sealing of protruded structural or servicing elements to the liner membrane shall be provided by an approved means that will avoid concentrated liner stress points and provide a permanently sealed point. Provision shall be made to allow the passage to the surface of all gasses and springs without damage to the liner.

One Piece Panel/Sheet Installation

  • Place the unpacked liner at position on berm level ground and unroll to its full length at pond perimeter.
  • Place the lower liner loose edge into the perimeter anchor trench allowing ample material to be secured to the full width and depth.
  • Hold the dam liner edge down by means of temporary sand bags intermittently along trench at its anchor position.
  • Subject to the stability of the berm, the material should be carried across the lining area by two separate installation crews each carrying half the total weight of the liner. Rapidly extend the liner from its concertina fold to the opposite perimeter trench while allowing ample liner to relax into its final position.
  • Avoid pulling or tugging at the liner after it has settled on the pond/dam bed as friction against the ground of a large liner area can be difficult to overcome. Careful planning beforehand will make the avoidable.
  • When the liner been loose laid with evenly distributed surface ripple, place all surplus liner material into the perimeter anchor trench, allowing ample liner on the pond/dam bed to avoid stretching from ground settlement after filling.

Multiple Piece Installation – On-site Welding

For very large liners, joining on site may be necessary. This is something that a professional must do as you risk leaks in the seams. A professional installation team from Fabric Solutions (or authorised installer), will be responsible for all on-site material welding. When directed by the professional installer, position the liners as explained above. Overlap panel edges approximately 200 mm.

Installing an Above Ground Pool Liner

Please read the entire installation guide before commencing installation.

Tools Needed:

  • suitable drill and bits(cordless is recommended)
  • rubber mallet
  • wet/dry vacuum cleaner
  • stanley knife
  • ladder to enter and exit the pool
  • pvc tape
  • screed (this can just be a flat piece of timber about 1500 mm long)
  • soft broom
  • small tube of vinyl safe silicone
  • level
  • some black plastic
  • your new liner

Preparing Your Pool Site

Preparation of your pool site before installation is vital to ensure your new pool liner looks great and fits well. Ensure the area around your pool site is free from Nut Grass. If you suspect Nut Grass, a good quality suitable poison should be used to kill the grass. Prepare a sand base and ensure that it is at least 50 mm deep over the entire base of the pool. A cove will need to be created all the way around the wall of the pool at least 150 mm high (see diagram A).

above_pool_liner_install_diagram_aDiagram A. Recommended setup for installing pool liners.

Step 1. Place new sand inside the pool area if required and screed to smooth the sand. This can be done with a garden rake or a piece of timber. Once the sand floor of the pool is completely smooth, compact it by tamping or rolling. Sprinkling water onto the sand will help the compaction. We recommend using a fine broom to remove any compaction marks (and foot prints) ensuring a good, smooth finish for the liner.

Step 2. With a cloth or soft broom, clean the walls of the pool to remove any sand and metal filings. We recommended using a PVC insulation tape or similar tape over the wall join bolts on the inside wall of the pool. It is also advisable to place a ground sheet or black plastic sheet between the sand and liner. This is secured to the pool wall above the sand cove with tape. Remove top copings or small round metal capping from the pool .

Fitting Your New Fabric Solutions Pool Liner

Step 1. Carefully unpack your above ground pool liner from the cardboard carton. Do not use any knife or sharp object to open the box as this may damage the liner. Take care when handling the pool liner. With one or more helpers inside the pool, pass the liner into the pool and place it to one end.

Step 2. Unroll the liner working towards the opposite end of the pool and gently open it ensuring the sand levels are not disturbed. Spread the liner so that the base to floor seam sits evenly about midway up the coving around the edge of the pool. Place the top of the pool liner about 150mm over the pool wall.

Pin the liner at each end of the pool and at either side. Clothes pegs work well to hold the liner in place. In some instances the pool liner may appear to be too small around the perimeter. The perimeter can be adjusted by evenly tensioning the perimeter of the liner as you place the top edge over the wall of the pool. Stretching the top perimeter of the liner slightly will not damage the liner.

Check there are no diagonal wrinkles in the wall of the liner. Wrinkles indicate either an uneven overlap or the wall is not square with the bottom. This can easily be adjusted by moving the top of the liner in either a clockwise or anti-clockwise direction until all wrinkles disappear. Check the seams on the floor of the liner are running straight and the base of the liner is flat with all large wrinkles removed.

Step 3. The removal of the remaining wrinkles can be done by either manually removing them or by vacuum (sucking the air out from behind the liner). If your pool has a deep end, it is strongly recommended that you use the vacuum system.

Manual Method

Manual Method

Place a garden hose in the pool and ensure all fittings that could damage the liner are removed. The person fitting the liner should get into the pool just prior to filling. *Note – the liner can be very slippery when wet*.

Start filling the pool until there is 25mm of water over the entire floor. Turn the water off and work out all the wrinkles on the floor. Start at the centre of the pool on your hands and knees (Diagram B). Taking care, gently move the wrinkles out in a circular motion, gradually moving all the excess liner material to the edges of the pool. If there is more than 50mm of water on the pool liner, it will be almost impossible to push any wrinkles out and persistence may cause damage to the liner.

Once satisfied that there are no wrinkles on the floor, adjust any excess liner material by lifting it over the edge of the pool. Continue filling the pool until the water is around 150mm deep or around 50mm above the cove area at the base. Take up slack from the wall of the liner, section by section. The wall of the liner should not have any horizontal or diagonal wrinkles in it.

DO NOT OVER-TENSION THE LINER. Secure the liner with the coping sections (as per your pool manufactures instructions) and continue to fill the pool to around 300mm deep. At this point you need to check the tension of the liner around the perimeter of the pool and if required remove the sections of coping near the affected area and release the tension.

Vacuum Method

Vacuum MethodPlace a suitably sized piece of cardboard around the skimmer box and secure with masking tape. Place the hose of the vacuum cleaner (a Wet & Dry type is recommended) through the pool water return fitting in the wall of the pool until it is around 250mm to 300mm above the sand. Tape around the hose at the wall making a seal (Diagram C). Double check that the liner has no large wrinkles or surplus material and make sure it is secured by the plastic strips.

When the vacuum is turned on, you’ll see the liner sticking to the walls. Continue to work the wrinkles out toward the edge of the pool. You may have to switch the vacuum off to adjust the tension of the liner a few times. This is normal.

Once you have the liner vacuumed out and ALL the wrinkles removed, start filling the pool with your garden hose. Ensure all fittings on the hose are removed or protected so they do not damage the liner.

LEAVE THE VACUUM RUNNING UNTIL THE POOL IS 300mm (12”) DEEP. Turn the vacuum off and carefully remove the vacuum hose from the wall of the pool. Ensure all tape is removed and that no tape falls between the liner and the wall of the pool. Removed the cardboard from the skimmer with the same care.

Replaced the coping, continue to fill the pool to the desired level.

Enjoy your new pool!

Water Tank Liner Installation Guide

Note: this guide is for an open space water tank ( no support columns)

Please thoroughly read through this installation guide before starting.

Also you must make sure your water tank is structurally sound before a liner can be installed.

Your new tank liner can be fitted into corrugated, poly, flat steel and concrete tanks that have either open or closed tops. The type of tank you have will determine how the tank liner is to be installed.

Before You Start

We recommend that you have the following:

  • Wet / dry vacuum or dust pan & brush
  • Heavy-duty PVC tape
  • Chalk stick for marking out
  • Screwdriver / stillson for removing outlet fittings
  • Sand, newspaper or geotextile underlay
  • Drill (preferably cordless) with 5mm bit
  • Ladder
  • Stanley knife
  • Rubber mallet
  • 1 cartridge of silicone natural cure sealant per 6m of tank perimeter when using extrusion
  • File and Hacksaw (for removing sharp edges and old fittings)

OPTIONAL ITEMS

  • 5mm pop rivets & rivet gun (or suitable fasteners, depending on type of tank)
  • Faceplate to seal around existing outlets
  • Fixing extrusion (or other fastening method)
  • Old garden hose & wire (optional for securing corrugated tanks)

IMPORTANT

Don’t let hot drill bits or other sharp tools come into contact with the liner!

Water Tank Preparation

Prior to placing, unfolding and installing the tank liner ensure that:

  1. the tank structure is completely dry and clean of all rust and scale.
  2. any metal surfaces should be coated with suitable rust proofing agent(s) and cured thoroughly.
  3. the tank is completely drained.
  4. make sure there are no hazards such as sharp edges, protrusions, stones, roots etc that have the potential to damage or puncture the tank liner.
  5. do not wear shoes or any other foorwear that could damage the liner.
  6. ensure any tools or ladders are placed on protective fabric or have protective feet/boots attached.
  7. drill new overflow outlet into tank wall if needed, refer to overflow pipe installation guide.

Installing the DURATANK Tank Liner Underday

If you are using a geotextile protection underlay (highly recommended) it will be supplied in two pieces, a base and a wall section. The base is simply placed on the floor as evenly as possible. The wall underlay will then be temporarily hung in place until the tank liner is installed.

Hang the geotextile protection underlay along the wall in four different places (best to use non-permanent fixing, such as heavy duty tape); this can be done by using the 3, 6, 9 and 12 o’clock positions or in the 4 corners for square or rectangular tanks.

For open top tanks, hang the liner over the edge. It is often a good idea to drill all of the fixings positions prior to hanging the liner. (Ensure all drill swarfetc is removed before hanging geotextile and liner). Do not worry about the rest of the geotextile wall as this can be hung at the same time as hanging the liner wall. If you do pre-drill all of the fixing locations for hanging the liner, make sure that there is a gap of at least 200mm between each fixing location.

The wall underlay will also overlap the base underlay by a small amount. You can tape any excess floor geotextile to the wall and overlap any excess material from the wall and or floor.

Put pressure on the geotextile adjacent to any hazards to make sure none of the hazards penetrate the geotextile. If the hazard pierces or is likely to pierce the geotextile, remove the puncture point.

Securing The New Liner

tank liner installation pics-02There are two ways to secure the tank liner installation, depending on the type of tank you have. With open top tanks, the liner is folded over the edge by about 150 mm and secured around the outside with wire (in the case of corrugated tanks).

Carefully unroll the liner on the tank floor and open the liner up, making sure that the centre of the liner (marked with 300mm diameter circle) is exactly in the centre of the tank. Take care when unfolding the liner and ensure that you unfold each fold one at a time. Make sure that the wall to base seam (the welded seam that continuously goes all the way around the tank) is pushed up against the floor/wall juncture (where wall meets the floor of the tank).

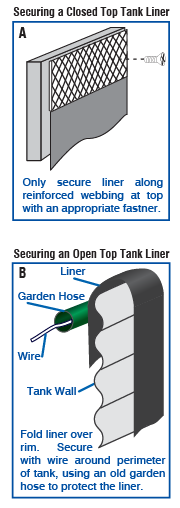
SECURING A LINER IN A CLOSED TOP TANK – Diagram A

With closed top water tanks, the liner can be secured with rivets, self- tapping screws or concrete wall anchors, depending on the type of tank. Mount or screw through the webbing.

Start hanging the liner wall by using the same method as you used when hanging the geotextile on the wall the 12, 3, 6 and 9 o’clock positions or the four corners. Ensure that the wall section is hung vertically. Check to see that the pleats (folds) are hanging vertically. When you start to hang the rest of the wall, hold the geotextile underlay wall material behind the liner wall and attach both of them at the same time.

If the folds (pleats) on the tank liner wall are not vertical then the tank liner will have to be re-adjusted.

At NO POINT is the liner to be under any tension in any place. The liner is made oversize and should not be tight, taunt or under load at any point.

SECURING A LINER IN AN OPEN TOP TANK – Diagram B

Check both the inside of the tank as well as the rim of the outside of the tank for any sharp or protruding objects that can either damage or puncture your liner. The Geotextile protection underlay should help protect the liner as much as possible when it is dropped over the top of the tank.

Once the liner is inside the tank, unroll the liner and make sure the liner is in place by checking the perimeter wall to base seam is right in the wall to base join of the tank. Fold both your Geotextile protection underlay wall and your liner over the top of the tank, making sure that any wrinkles which appear on the liner wall during installation are eliminated (pull the liner wall against the wrinkles).

Once there are no more wrinkles on the liner wall, fix the liner to the outer rim of the tank by tying fencing wire around the perimeter of the tank. Make sure that there is plenty of slack at the bottom of the liner wall inside the tank so that it is easier to install your tank fittings.

Please Note: Due to potential risk of the fencing wire damaging the liner, it is strongly recommended that the wire is covered (example: Garden Hose).

Re-adjusting The New Tank Liner

The easiest way to do this is to leave excess material between the four initial hanging points and then keep attaching in the middle (between 2 points). Once the 12, 3, 6, 9 o’clock or corner positions have been attached, go to the mid points between each of the above initial attaching points. Continue attaching mid points until the liner has been completely attached in each section.

Once the liner wall has been fully hung (attached) all the way around the tank and the folds/pleats are all about the same size and spacing all around the perimeter, walk around the base floor junction and start pushing the wall to base seam (the same as talked about in step 2) into where the floor of the tank meets the wall. If done correctly then there should be some overhang were the liner wall folds over itself near the base, the reason for this is so that when filling the tank there is no stress on the wall.

Installing the Fittings for Poly and Metal Tanks

tank liner installation pics-05When installing a fitting, ensure that there is sufficient slack material all around the penetration. There should be no stretching of material near or at the fitting. Locate where your fitting needs to be positioned and cut a hole smaller than the threaded pipe for you fitting into the tank liner.

Once this has been done, put a bead of potable grade silicon around the threaded pipe of the fitting (just above the rubber gasket) and push the fitting through the hole of the liner, making sure the fitting goes through the tank penetration to the other side of the tank.

After the fitting has been installed from the internal side of the tank to the external side, tighten the second nut of the fitting against the outside of the tank, making sure that the fitting is as tight as possible.

Go back inside the tank and put a big bead of silicon all the way around the outside of the circumference of the fitting, as this will create an extra layer of waterproofing. Once this has been done, let the silicon dry and start checking the liner.

After Installation of Your New Tank Liner

The final step is to check the liner. In order to do this you will need to partially fill the tank (around 300mm to 400mm). If for any reason the tank cannot be filled or at least have 300 – 400mm of water covering the floor, you must secure the liner in such a way as to prevent any movement of the liner within the tank. When filling, if there is any stress or tension on the liner, drain the tank and re-adjust the liner to eliminate the problem.

Installation of a Reinforced Pool Liner

LOGOWhen renovating a pool or even installing a liner into a new pool, you need to consider the type of liner for the pool you are using. This question is also more than just “is it above ground or and inground pool” question. Most people are aware that PVC pool liners are available in different thicknesses. The main difference is that 0.5 mm thick liners are normally for above ground pools and the 0.75 mm pool liners are typically used to line inground pools. What many people are unaware of is that there is also a reinforced version of pool liners available.

completed inground pool linerSo this begs the questions, when would you need to install a reinforced liner?

To answer this question properly, you need to understand how pool liners work. The PVC membrane used to make a pool liner is a flexible PVC fabric. It is made to the shape of a pool, and the weight of the water in the pool will keep the liner in place. This is why it is a bad idea to leave a pool empty, as the pool liner will shift. In most situations, this method works very well for securing a pool liner in place. However under certain conditions, say for example indoor pools (that may well be heated), the pool liner can ‘absorb’ water. When the pool liner begins to absorb water, it starts to expand and after a while the liner will wrinkle. The wrinkles typically appear at the bottom of the pool first, but can appear anywhere.

The affected area of vinyl that has wrinkled will eventually start to weaken, and when seen up close cracks can be seen. These tiny cracks if left will eventually form larger tears. As the process is irreversible, once this happens, the lifespan of the liner is greatly reduced.

Using a reinforced Liner

For pool installations where the risk of the pool liner wrinkling is know it is best to use a reinforced PVC pool liner. The Acqua di Lusso range of reinforced pool liners feature an internal reinforcement layer that helps keep the liner stable. These reinforced pool liners are a 3 ply layer design comprising of a PVC base layer, a layer of reinforced polyester mesh that is capped with another layer of PVC. All three layers are permanently fused together to form a homogenously pool liner membrane that can stabilise the pool liner against expansion and shrinkage.

Installation of a Reinforced Pool Liner

The Acqua di Lusso range of inground and above ground pool liners are like other traditional pool liners in that they are fully pre-welded and shaped inside a factory. The liner is then stretched into place onsite.

Reinforced pool liners have to be fabricated onsite, inside the pool, as the reinforced layer does not allow the liner to be stretched and formed to the pool shape. Sections of Acqua di Lusso are laid into the pool, with overlapping seams welded together to form a water tight joint. Edges are also sealed to prevent wicking and finish off the water proofing process. This process also means any shape of pool, including steps and benches can be accommodated.

So if you are looking to install a PVC liner in an indoor pool or other situations where wrinkling may occur, we recommend the use of a reinforced PVC such as Acqua Di Lusso Reinforced.

Pool liners – How to Maximise Their Life

Most people are aware that in order to maintain a clean and healthy pool, certain maintenance tasks need to be performed routinely. These tasks include regular vacuuming, cleaning the filter and checking the chemical levels.

In regards to chemicals that are used in the pool, if misused, these chemicals can be dangerous to swimmers and damaging to the pool liners. So it is imperative that proper dosage levels are adhered to at all times. More is also not necessarily better either, as a too high a dosage can be detrimental to not only the water, but the pool liner as well and can make the pool unpleasant to swim in.

refurbished_with_pool_linerMost swimming pools in Australia will experience two climates: the active summer and the dormant winter time. Each time of year will require different maintenance schedules because the amount of activity in the pool changes.

Your pool’s pH level should always be carefully monitored, and should be above 7.0 to 7.6. Below this and it will be acidic (quite often the cause of stinging eyes after prolonged swimming). Above this and your pool will be too alkaline (quite often the cause of skin rashes after prolonged swimming). When adding chemicals to your pool, there are three important points to note:

  • Never add the raw chemical to your pool, always premix it first
  • When premixing with water, NEVER add water to the chemical, ALWAYS add the chemical to the water until the concentration is correct.
  • Never allow the raw chemical to come in contact with the pool liner, this can stain or damage it.
  • You should consider adding the pre-mixed chemicals directly to the skimmer box.

Winterising Your Pool

During winter, as the pool doesn’t get used and will be dormant for many months it is a good idea to “winterise” it. This process involves adjusting the pH to 7.6 and super chlorinating to 5 ppm. This controls algae and bacterial growth in the water. This can also be accompanied by the use of a pool cover, which greatly reduces evaporation, stops leafs and other debris entering the pool and even lowers the amount of chemical that is required. Pool blankets also have the added bonus of trapping in heat, which can extend the swimming season up to a couple of months with a good solar cover.

Always maintain correct water levels for the pool, summer or winter. Don’t think that just because the pool isn’t in use, the amount of water in it can allowed to drop. The water holds the pool liner in place, if the water lowers, the liner can shift and wrinkle.

Reopening Your Pool

Reopening your pool and getting ready for summer should be a simple process if regular checks and maintenance have been followed. Pool chemical levels are restored to normal levels:

  • pH – adjust to between 7.4 and 7.8
  • Free Chlorine levels should be around 1.0 to 3.0 ppm
  • Alkalinity of the water should be between 100 ppm and 150 ppm
  • Water hardness for calcium should be around 200 ppm and 300 ppm
  • Dissolved solids should be below 500 ppm

Main Points

Summer or winter, regular maintenance will give you the best out of your pool. So always make sure you at least;

  • Monitor your chemical levels at least once a week
  • When adjusting chemical levels, adjust slowly and wait at least 6 hours before re-testing or adding more chemicals
  • Cover your pool when not in use, this greatly reduces debris and dirt in your pool, and means you use less chemicals
  • Never let the pH fall below 7.0

Tips How A Water Tank Can Fail

LOGOThere are many ways you can make a water tank, all depending on your usage, location and budget. In most cases when a water tank fails, there are several options for the water tank repair, including a tank liner or just patching the leak. Other options do exist, but many do not fix the root cause of the problem, such as cracks from ground movement. So when fixing a tank, make sure the fix will also address potential problem in the future.

Concrete & Concrete BlockWater Tanks

Concrete water tanks are very thermally stable so they naturally keep water cooler. This means there is a lower risk of algae blooms and other bacteria forming.   They are also generally considered bushfire proof, and hence are popular in dense bush areas where fires are an issue. These are also the only type of water tanks that can be installed inground.

leaking water tank repairA concrete water tank will most likely start to leak due to small ground movements causing cracks in the structure. Ground movement is commonly caused by longer periods of wet and dry, causing reactive clay soils move.Choices for repair mean either sealing the crack or installing a tank liner. While more expensive, a tank liner will accommodate future ground movement, while an isolated repair will not.

Steel & Corrugated Water Tanks:

Long life spans and the ability to keep water cool make these water tanks an attractive option as well. A steel water tank can also be considered to one of the most environmentally friendly, in that almost 100% of the tank can be recycled at the end of its life.

Steel water tanks most commonly leak due to corrosion. Apart from a leaking tank, the rust and corrosion will potentially contaminate your drinking water as well. Repairs mean either removal of the corroded area and preventing further corrosion.

Plastic Water Tanks:

Tanks made from polyethylene are now the most popular type of rainwater tanks in residential areas, due to the economical pricing and lightness of materials. Tanks are also made without any seams and will not rust or corrode. While they can also be almost 100% recycled, the very low thermal mass means the water will heat on hot days.

Leaking can occur either from degradation of the plastic, with cracks or splitting of plastic occurring. Usually the crack or hole in the water tank can be welded as a repair, but joint strength will be dependent on the skill of the welder, meaning very often repairs need to re-done. Large splits can accommodated with a tank liner and a steel band.

Wood and Brick Water Tanks:

Wooden water tanks are much less common today, but they still do have their place. The iconic New York City skyline water tanks are one example where they are the cheapest option. They are still made from wood today primarily because they can be built in place high up on the roofs in a fairly quick and easy fashion, negating the need for specialized equipment that would otherwise be required to get a pre-built water tank in place.

A good wooden water tank can last up to 30yrs, with ground movement causing small cracks to appear.

Fibreglass Water Tanks:

Very stiff and rigid, fiberglass water tanks are corrosion resistant and very water tight. They not as heavy as a concrete water tank, making them easier to transport. Similar to concrete tanks, cracks can appear due to ground movement and methods of repair include sealant or a tank liner.